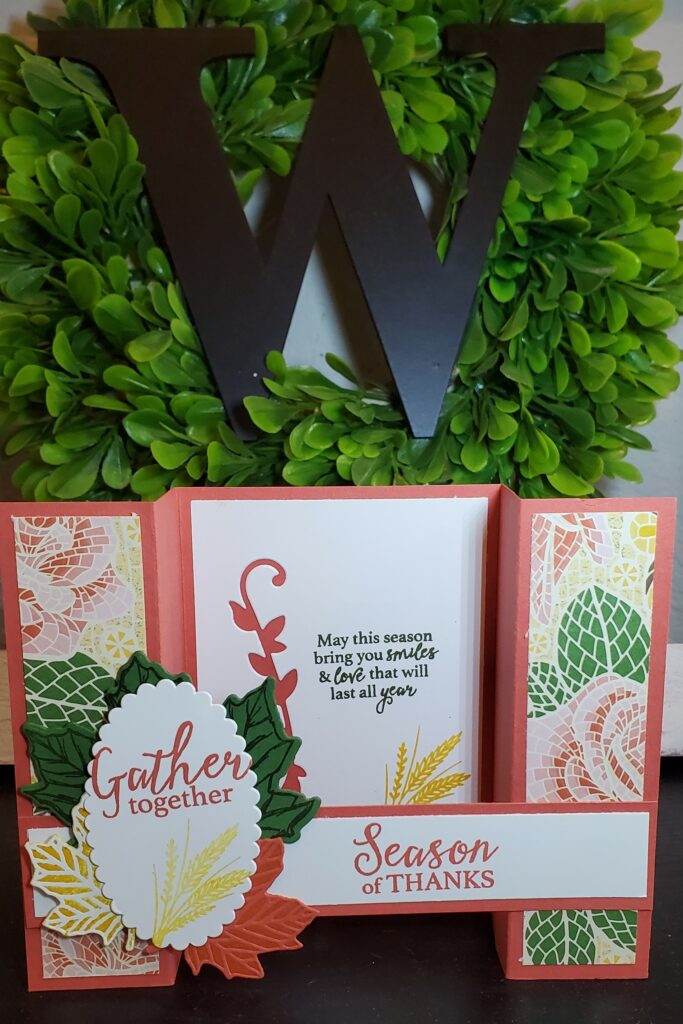
I love this card, the Bridge Card is diverse, it can be used for any season any reason!
RECIPE STARTS HERE:
Terracotta Tile Card Base is 8″x4 1/4″ scored RtoL: 1 1/4″ 2 1/2″ 5 1/2″ 6 1/4″
same card stock: 5 3/8″x1″ and 2″x2″
Whisper White: 5 1/8″x3/4″ 3″x2″ 4″x2 3/4″
Garden Green: scrap 3″x3″
Mosaic Mood DSP 1″x4″ (2pcs)
Layering Ovals & Butterfly Dies were used
Snail & black dimensionals for adhesive
Here is how you build it!
>>Adhere your DSP to the two end panels with snail
>>Stamp your sentiment just left of center on the WW 5 1/4″x3/4″, then adhere it to the TT 5 1/2″x1″
>>Stamp your inside sentiment on the WW 4″x2 3/4″ just above center and 1/3 from the left. Your image can go to the lower right corner.
>>Run the inside WW with the floral spray through your die-cutting machine, then adhere it to the center panel of the card base.
>>Stamp your leaf on the GG 3″x3″ & die cut with Leaf die
>>using the smaller leaf dies, lay on your ink pad and carefully pick up & place on the WW, then run through the die-cutting machine…repeat on the TT 2″x2″
>>adhere the smaller leaves to each other & the bigger leaf with snail.
>>Stamp your lead sentiment & image on the WW 3″x2″, then run it through your die-cutting machine with the layered oval of choice & adhere to the leaf spray. Adhere this to the left panel with black dimensionals
NOTE: If you wish to write a personal note, then you can adhere a WW (4″x2 3/4″) panel to the backside of the card base
Happy Stamping!
Product List


