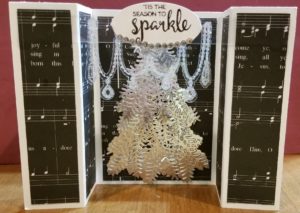
This card is a mix of two sets and a beautiful Designer Series paper (DSP). Even though it looks complicated, this is a simple card to make. BEWARE – your arm will get a work out from cranking the Big Shot to get the tree branches cut! I was inspired by Sandi MacIver’s tutorial on how to do a bridge card. Our Chandelier & Christmas Staircase
I was inspired by Sandi MacIver’s tutorial on how to do a bridge card. Our Chandelier thinlits and Christmas Staircase thinlits spoke to me for this card. I wanted to show off the pretty silver Christmas tree without blocking it and yet have some sparkly bobbles! I used window sheet pieces and stamped with Versa Mark some of our heat & stick and dazzling diamonds glitter for the sparkly bobbles from Season to Sparkle stamp set. One thing I thought of after I completed this card was to find a way to make a color wheel (like we had way back when!) I will post again when I figure that out.
INSTRUCTIONS & MEASURES:
Thick WW card base 4 ¼”x 8” scrap Whisper White card stock
Score card base at 1 ¼”, 2 ½”, 5 ½”, 6 ¾”
DSP 4×6 ¾” (make sure your pattern is going in correct direction)
Cut DSP on 6 ¾” side at 1”, 1”, 2 ¾”,1”
4″x6″ Silver foil paper Embossing Buddy Heat Tool
4″x3″ Window sheet Dazzling Diamonds Glitter Heat & Stick powder
Adhere DSP to card base from left to right as cut leaving the 2 outside 1”x4 ¼” pieces loose at the top. Apply a strip of Tear Tape at the top of the 2 outside edges of the card base. Do not remove the covering on the tear tape, you will be connecting your bridge piece there.
Window sheet – cut ½” strip off. Rub the embossing buddy over the remaining piece and stamp the swoopy bobbles on the window sheet with Versa Mark ink, quickly cover with Heat & Stick and set with the heat tool. Quickly dust with Dazzling Diamonds glitter (shake off excess) and set with heat tool. Use glue dots to adhere the bobbles in the center of the 1/2″ strip.
On the scrap Whisper White – Stamp your sentiment in Basic Black ink. Use Layering Oval framelit to cut with Big Shot, and adhere with glue dots to the top of the ½” strip (this will be the bridge). Set aside.
Run the Christmas Tree & branches through Big Shot on the Silver Foil paper… you will need 7 large branches and multiple small branches. Adhere the tree to the center back panel with multipurpose glue. Use multipurpose glue to adhere the large branches first to the solid tree and fill in with the small branches.
Now we fold the card base in mountains & valleys. Fold in-ward at 2 ½”, then back at 1 ¼” on the left, in-ward at 5 ½”, then back at 6 ¾” on the right. Burnish the folds carefully, your tree is in the center.
Remove the release paper & line up your bridge piece (below the DSP line) and adhere the left side. Use another piece of tear tape or snail to adhere the DSP in place. Fold the left side of your card down with the right side extended. Remove the release paper & line up your bridge piece (below the DSP line) and adhere the right side. I used another piece of tear tape or snail to adhere the DSP in place.
Product List


